What you'll learn
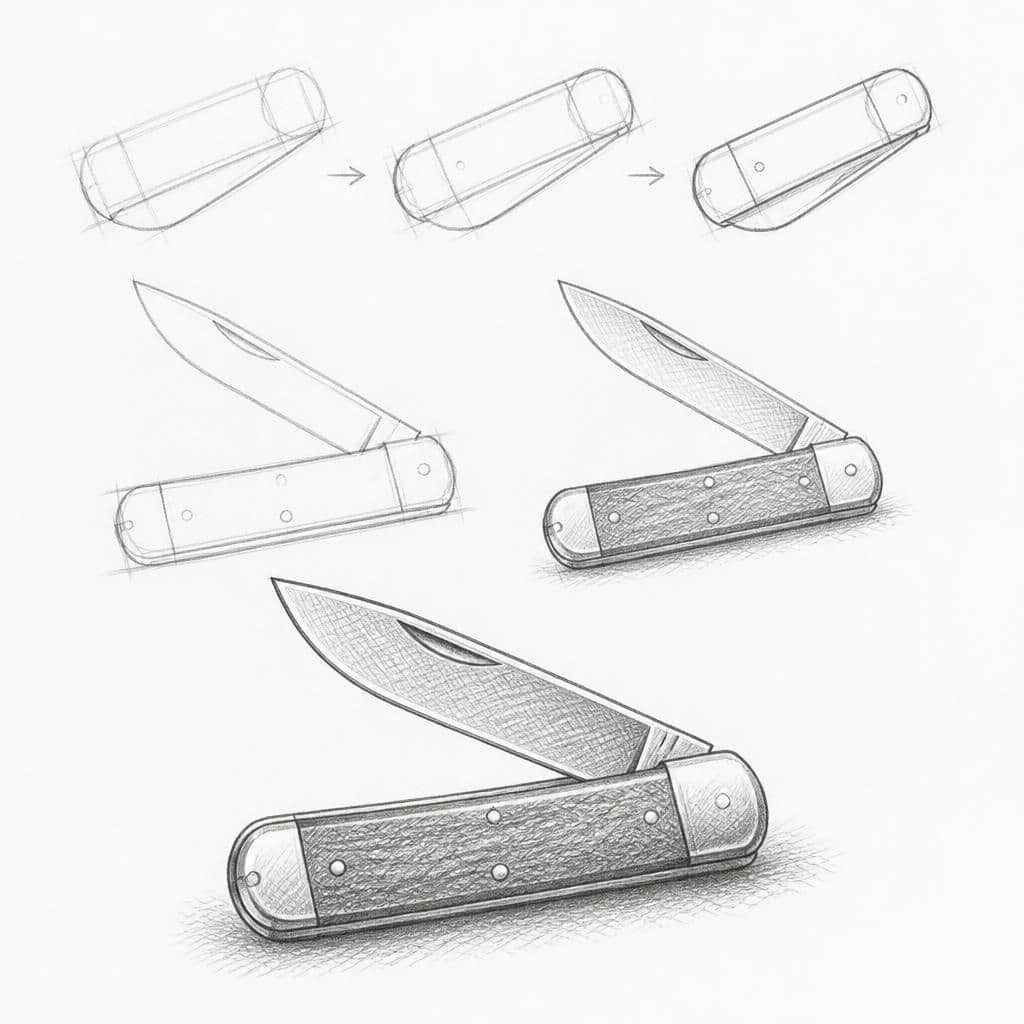
A pocket knife offers a good practice opportunity to explore different textures and subtle changes in value. The metallic surface and varying shapes allow the artist to delineate reflections and shadows using cross-hatching.
What you'll need
Step-by-step: how to draw pocket knife
Position the pocket knife under a direct light source to create distinct shadows and highlights.
Begin by outlining the basic shape of the knife lightly with a pencil.
Use cross-hatching to shade the areas in shadow, varying the density for darker values.
Emphasize the reflection on the blade with lighter strokes, leaving some areas unshaded for highlights.
Before you start: what to look at
Before drawing, observe the blade's reflective surface and how the light creates distinct highlights and shadows. Notice the curvature of the handle and the way its edges intersect. Pay attention to the scale of the hinge in relation to the entire knife as it affects the overall proportion.
Pro tips for drawing pocket knife
Common mistakes drawing pocket knife
Self-evaluation checklist
Check if the shading demonstrates a clear light source and creates a sense of depth. The contrast between highlights, mid-tones, and shadows should be apparent.
Frequently asked questions
How do I capture the metallic texture of the blade?
Focus on the contrast between the dark shadows and bright highlights. Use lighter, more spaced-out cross-hatching for reflective areas, while denser strokes can define the matte surfaces.
What's the best way to draw the rounded edge of the handle?
Start with a light outline to define the curvature. Pay attention to the light source. Use gradual shading to transition smoothly from light to shadow, emphasizing the handle's roundness.
How do I handle drawing the knife in perspective?
Begin with basic geometric shapes to establish the knife's orientation. Ensure parallel lines converge towards a single point on the horizon. Adjust proportions to maintain accuracy in foreshortening.
More drawing lessons
Get a new drawing lesson delivered to your inbox every morning, free.
Subscribe to Draw Daily →