What you'll learn
Drawing a paintbrush helps beginners focus on breaking down complex shapes into simpler geometric forms. This exercise trains the eye to identify cylinders and rectangles as foundational elements.
What you'll need
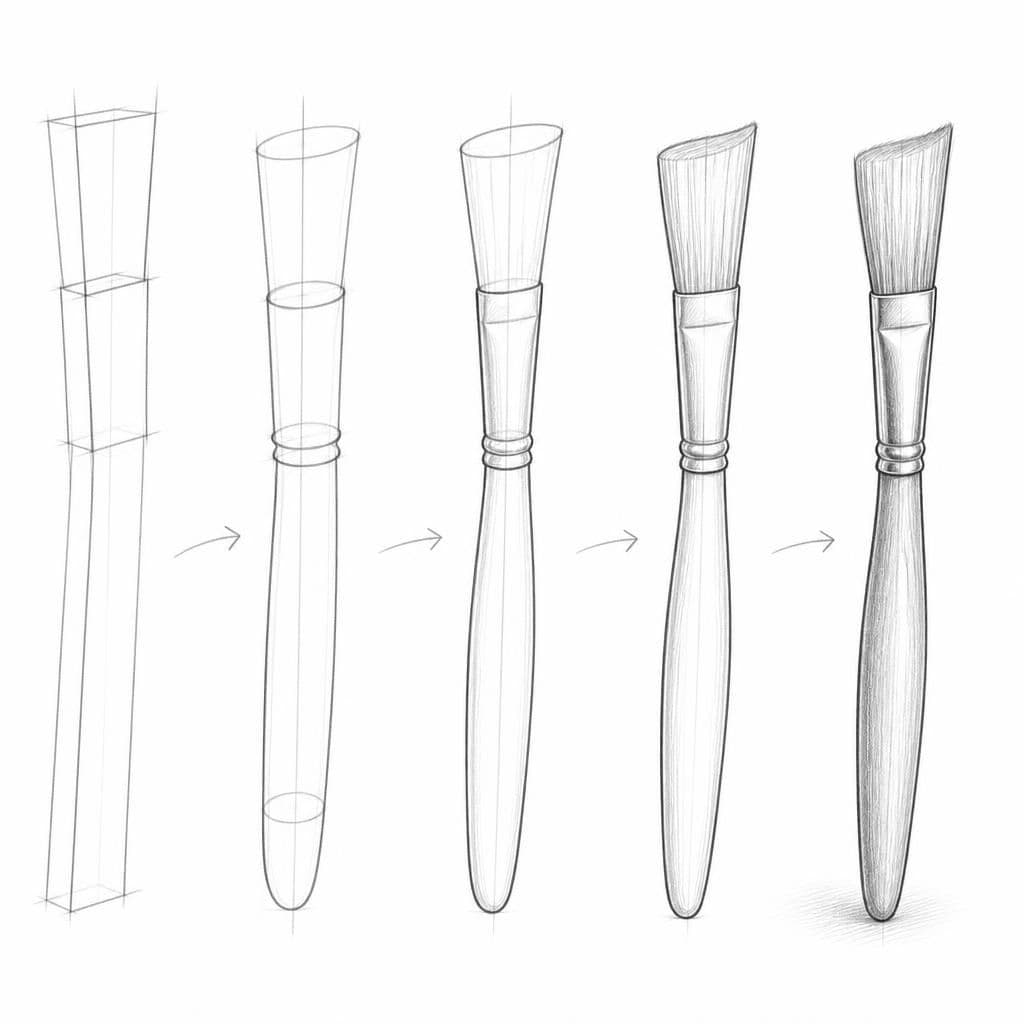
Step-by-step: how to draw paintbrush
Start by drawing a long, narrow rectangle for the handle. This will be the main structure.
Add a smaller rectangle at one end to represent the metal ferrule that holds the bristles.
Draw a cylinder shape at the end of the ferrule for the bristles. Make sure the cylinder is slightly rounded.
Refine the shapes, adding some curves to the handle and bristle tips, to make the paintbrush look more realistic.
Add details like the division between the bristles, any texture to the handle, and shadows to ground the object.
Before you start: what to look at
Before drawing, observe the slight tapering of the handle as it approaches the ferrule and how the light reflects differently on the metal ferrule compared to the wooden handle. Notice how the bristles fan out slightly at the tips, and how shadows play between the bristles and the ferrule.
Pro tips for drawing paintbrush
Common mistakes drawing paintbrush
Self-evaluation checklist
Check that the paintbrush elements fit together seamlessly, with correct proportions between the handle, ferrule, and bristles, maintaining overall symmetry.
Frequently asked questions
How can I accurately represent the shine on the metal ferrule?
Focus on the highlights and reflections. Use lighter pencil strokes to indicate the areas where light hits directly and sharper, darker lines for the edges. This contrast will help capture the metallic quality.
What is the best way to depict the texture of the bristles?
Use fine, short lines to represent individual bristles. Vary the line weight slightly to show the natural irregularities and ensure they fan out realistically from the ferrule. This adds depth and dimension.
How do I maintain correct proportions in my drawing?
Start by measuring and lightly marking the lengths of the handle, ferrule, and bristles. Constantly compare these sections as you draw, using reference points to ensure each part is in proportion to the others.
More drawing lessons
Get a new drawing lesson delivered to your inbox every morning, free.
Subscribe to Draw Daily →