What you'll learn
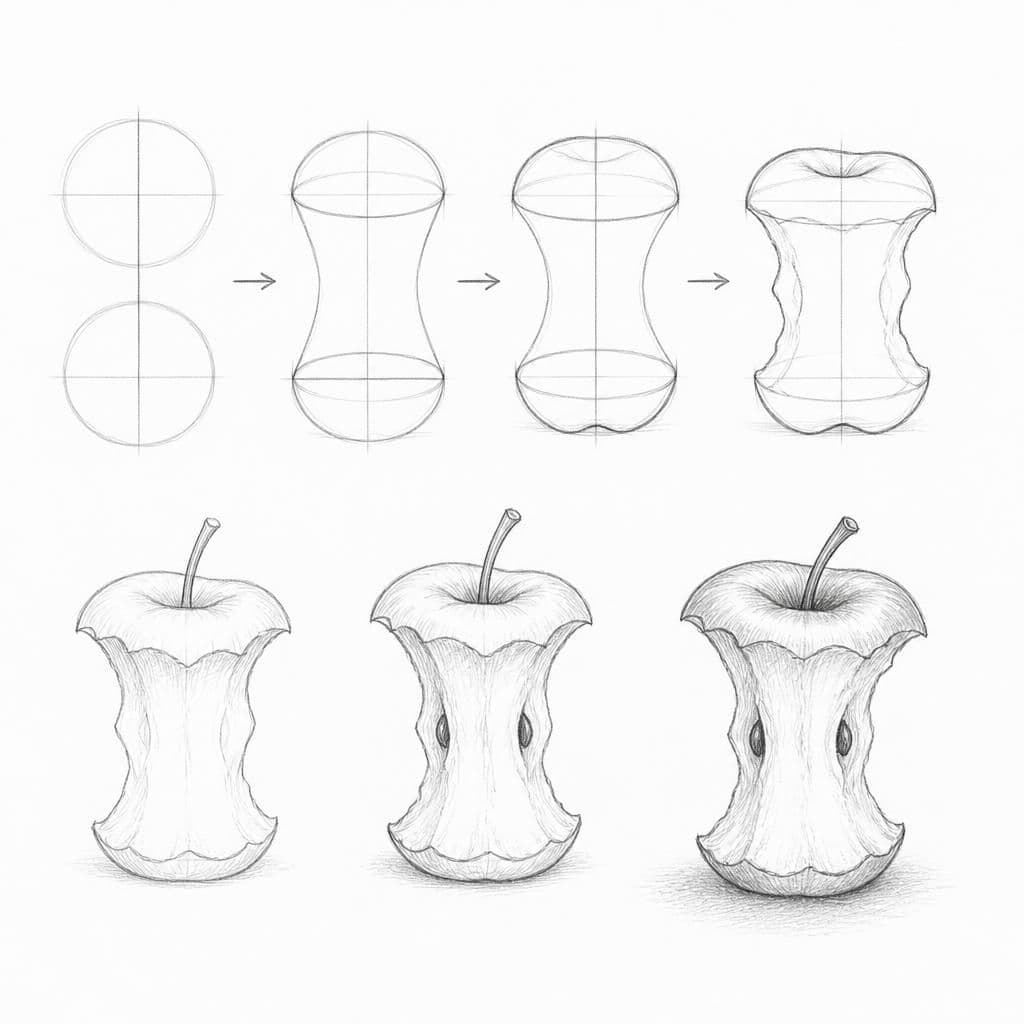
Drawing an apple core helps beginners learn to break down complex organic shapes into basic geometric forms. This exercise focuses on constructing the central cylindrical core and the remaining apple exterior using simple shapes.
What you'll need
Step-by-step: how to draw apple core
Start by sketching a vertical cylinder to represent the core of the apple. This will act as the central guide for your drawing.
Add two circles at the top and bottom of the cylinder to represent the apple's top and bottom where the core protrudes.
Sketch the outer apple shape using a slightly curved line that sweeps around the cylinder, connecting the top and bottom circles.
Refine the outline by adding bumps and irregularities to mimic the uneven surface and texture of a real apple core.
Finally, add a few seeds and textures on the core itself by using small ovals and irregular shapes.
Before you start: what to look at
Before drawing, closely observe how the top and bottom circles of the apple core align and balance with the central cylinder. Notice the subtle curve of the remaining apple flesh and how it creates a natural flow around the core. Pay attention to where the light hits the apple core, creating highlights and casting shadows on its surface.
Pro tips for drawing apple core
Common mistakes drawing apple core
Self-evaluation checklist
Check that your apple core maintains the cylindrical structure and that the outer apple shape looks balanced and symmetrical. Assess if the texture and details add depth to the sketch.
Frequently asked questions
How do I ensure the apple core looks three-dimensional?
Focus on creating depth by shading the sides of the cylinder and the curved outer apple shape. Observe where shadows naturally fall and add them to your drawing to enhance dimensionality.
What is the best way to draw the uneven surface of an apple core?
Use light, varied pencil strokes to outline the bumps and indentations. Vary the pressure on your pencil to create an organic, rough texture that mimics the apple's natural surface.
How can I make the seeds look realistic?
Draw small, irregular oval shapes to represent the seeds, varying their size and placement. Add subtle shadows or darker areas around the seeds to give them depth and make them stand out against the core.
More drawing lessons
Get a new drawing lesson delivered to your inbox every morning, free.
Subscribe to Draw Daily →