What you'll learn
Drawing a ceramic teapot demands attention to its curves, spout, and handle. Observing these elements will enhance your ability to capture the essence of its shape and subtle details.
What you'll need
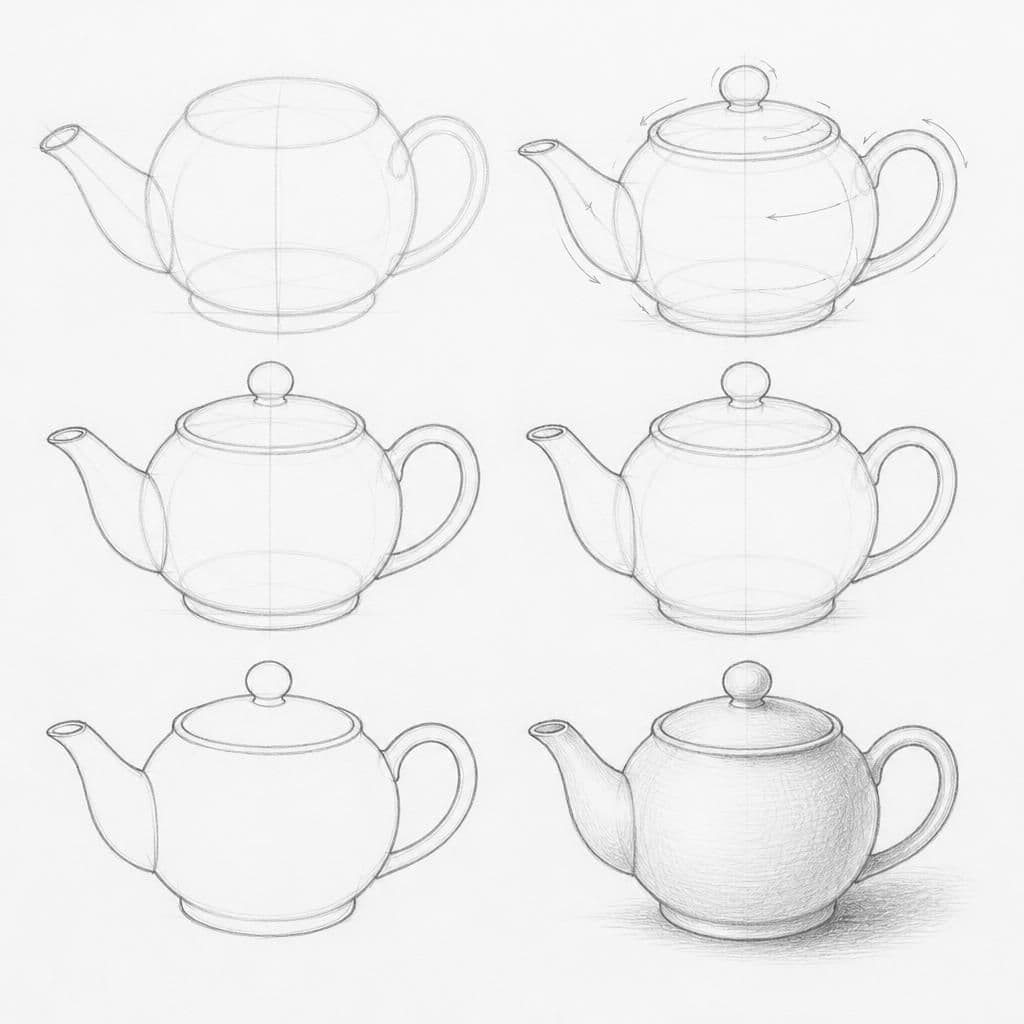
Step-by-step: how to draw ceramic teapot
Position the teapot in front of you under good lighting. Spend a minute analyzing its curves, handle, and spout.
Start with a light sketch of the overall shape, focusing on the teapot's contour. Keep your lines loose and light.
Refine the outline by adding more detail to the spout and handle, paying attention to the smooth transitions.
Add final touches, emphasizing shadows and highlights to convey depth and volume, but remain focused on accurate contours.
Before you start: what to look at
Before drawing, examine where the teapot's body is widest and how it narrows towards the spout and handle. Observe the rim of the teapot and how light reflects on its curves, especially on the spout tip and handle bend. Note any cast shadows under the handle or where the body curves subtly into the base.
Pro tips for drawing ceramic teapot
Common mistakes drawing ceramic teapot
Self-evaluation checklist
After completing the sketch, compare your drawing's contours and proportions to the actual teapot. Check for accuracy in capturing its form and spatial relationships.
Frequently asked questions
How do I accurately capture the roundness of the teapot's body?
Start with basic shapes like ovals or circles to map out the roundness. Use light lines to adjust proportions before adding more definition. This helps achieve symmetry and volume in your drawing.
Why does my teapot's spout look off?
Check the angle and curve of your spout. Often, inaccuracies occur when the spout is not aligned properly with the body or lacks the correct curve. Observe the attachment point and ensure it flows naturally from the teapot.
What should I focus on to make the handle look realistic?
Pay attention to where the handle connects to the body. Look for highlights that suggest its rounded form. Sketch the handle's curve lightly first, ensuring it mirrors the teapot's contours and maintaining consistent thickness.
More drawing lessons
Get a new drawing lesson delivered to your inbox every morning, free.
Subscribe to Draw Daily →