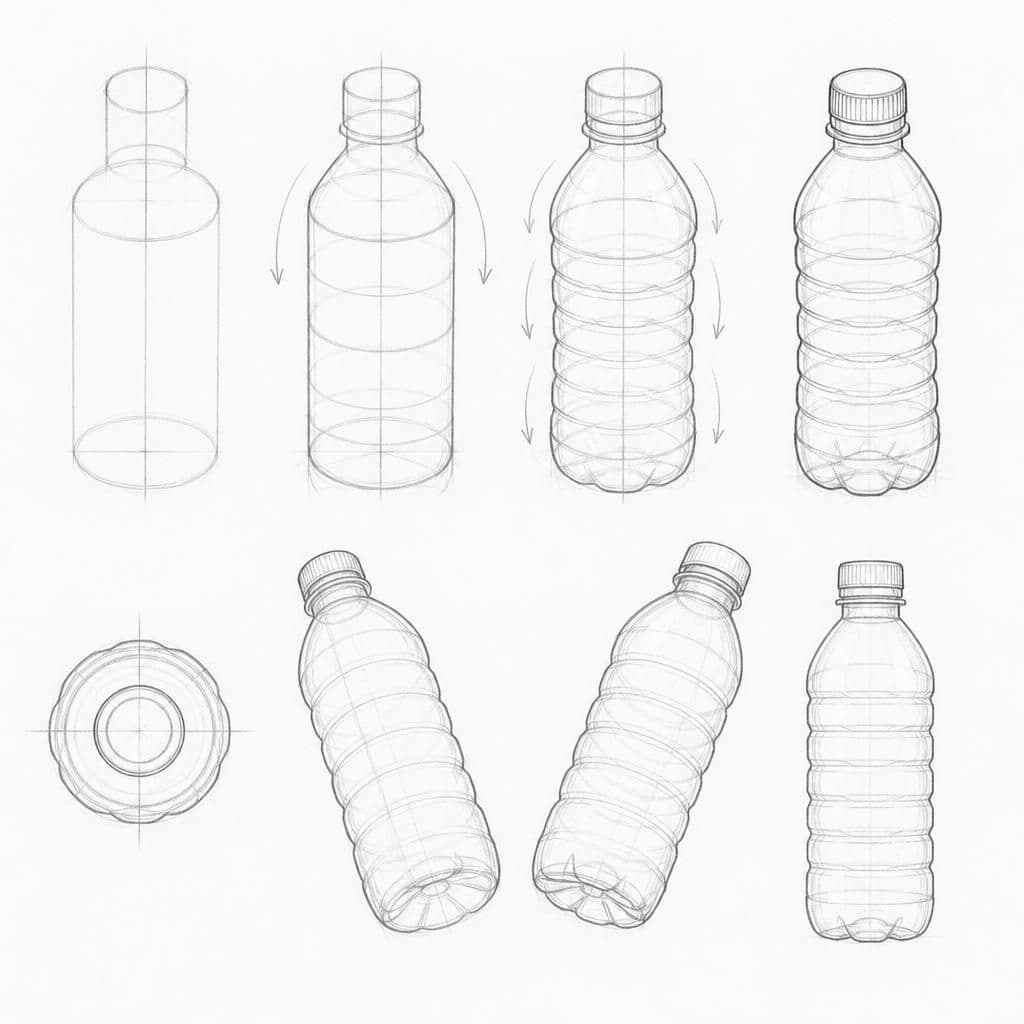
What you'll learn
Drawing a water bottle helps focus on contour lines, which define the shape and structure of the object. This exercise allows beginners to practice varying line weight to represent the cylindrical form and surface details.
What you'll need
Step-by-step: how to draw water bottle
Observe the water bottle closely, noting its overall shape and any distinct features.
Start by drawing the outline with light, continuous lines to capture the basic form.
Add contour lines that follow the curves of the bottle, paying attention to line weight to suggest volume.
Refine the drawing by adjusting line weight and adding details, such as ridges or labels.
Before you start: what to look at
Focus on the ellipse at the top and bottom of the bottle, as these help define its cylindrical shape. Observe where the light hits the surface, creating highlights, and note any labels or text that add texture. Look at the proportions between the neck, body, and base of the bottle to ensure accuracy.
Pro tips for drawing water bottle
Common mistakes drawing water bottle
Self-evaluation checklist
Check if the line weight varies appropriately to convey volume and if the contour lines accurately represent the shape of the water bottle.
Frequently asked questions
Why do my ellipses look off when drawing the bottle's top and bottom?
Ellipses can be tricky. Ensure the top and bottom ellipses are parallel and maintain consistent curvature. Practice drawing ellipses separately to build confidence.
How should I handle the textured parts like ridges or labels?
For textures, use lighter lines to suggest subtle details without overwhelming the main form. Pay attention to where these textures change the surface contour and adjust line weight accordingly.
What is the best way to show the transparency of the bottle?
Use lighter lines for the back contours and consider leaving parts of the surface blank to suggest transparency. Focus on drawing reflections and highlights accurately to enhance the sense of a see-through material.
More drawing lessons
Get a new drawing lesson delivered to your inbox every morning, free.
Subscribe to Draw Daily →