What you'll learn
Drawing tree bark allows you to practice creating rough, intricate textures common in nature. It challenges you to render the irregular patterns and variations that give bark its distinctive surface.
What you'll need
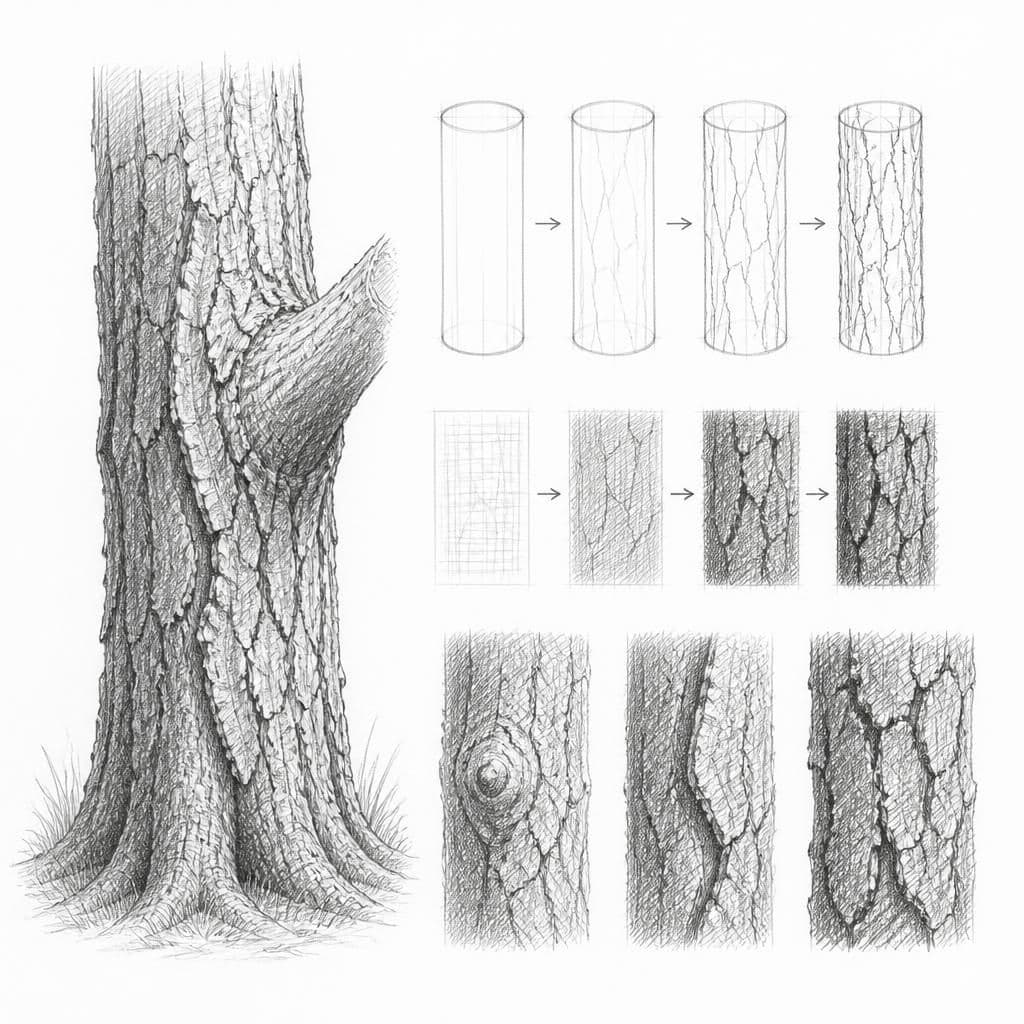
Step-by-step: how to draw tree bark
Start by lightly sketching the outline of a tree trunk on your paper.
Identify the natural curves and patterns in the bark. Pay attention to the directionality.
Begin shading using cross-hatching to suggest depth and texture, focusing on areas with more shadow.
Vary the pressure and angle of your pencil to create contrast, lighter strokes for lighter areas and darker strokes for shadows.
Add finer details like cracks and lines to enhance the bark's appearance.
Review your drawing, adding any additional lines or shading to deepen the texture.
Before you start: what to look at
Look closely at the way the light interacts with the bark, highlighting certain ridges while casting shadows in the grooves. Observe the natural curves and irregularities along the trunk, noting any distinctive cracks or patterns that repeat. Pay attention to the proportion of light to shadow as this will guide your shading technique.
Pro tips for drawing tree bark
Common mistakes drawing tree bark
Self-evaluation checklist
Check that the texture of the bark is suggestive of its natural roughness. Evaluate whether the shadows enhance the depth and if the characteristic patterns are clearly defined.
Frequently asked questions
How do I capture the texture of different tree species?
Each tree species has distinct bark characteristics. For example, birch may have smooth, papery layers while oak features deep, rugged grooves. Start by observing the specific patterns and textures unique to the species you are drawing.
What should I focus on if I'm struggling with the intricate details?
Begin with the larger patterns and basic shapes before moving to finer details. Simplify complex areas by breaking them into smaller sections. Use light pencil strokes to map out where details will go before committing with darker lines.
How can I make my drawing look more three-dimensional?
Emphasize the play of light and shadow by using varying pencil pressures. Darken shadows in the deeper grooves and use lighter strokes on the raised surfaces where light hits. This contrast will give your drawing a more three-dimensional appearance.
More drawing lessons
Get a new drawing lesson delivered to your inbox every morning, free.
Subscribe to Draw Daily →