What you'll learn
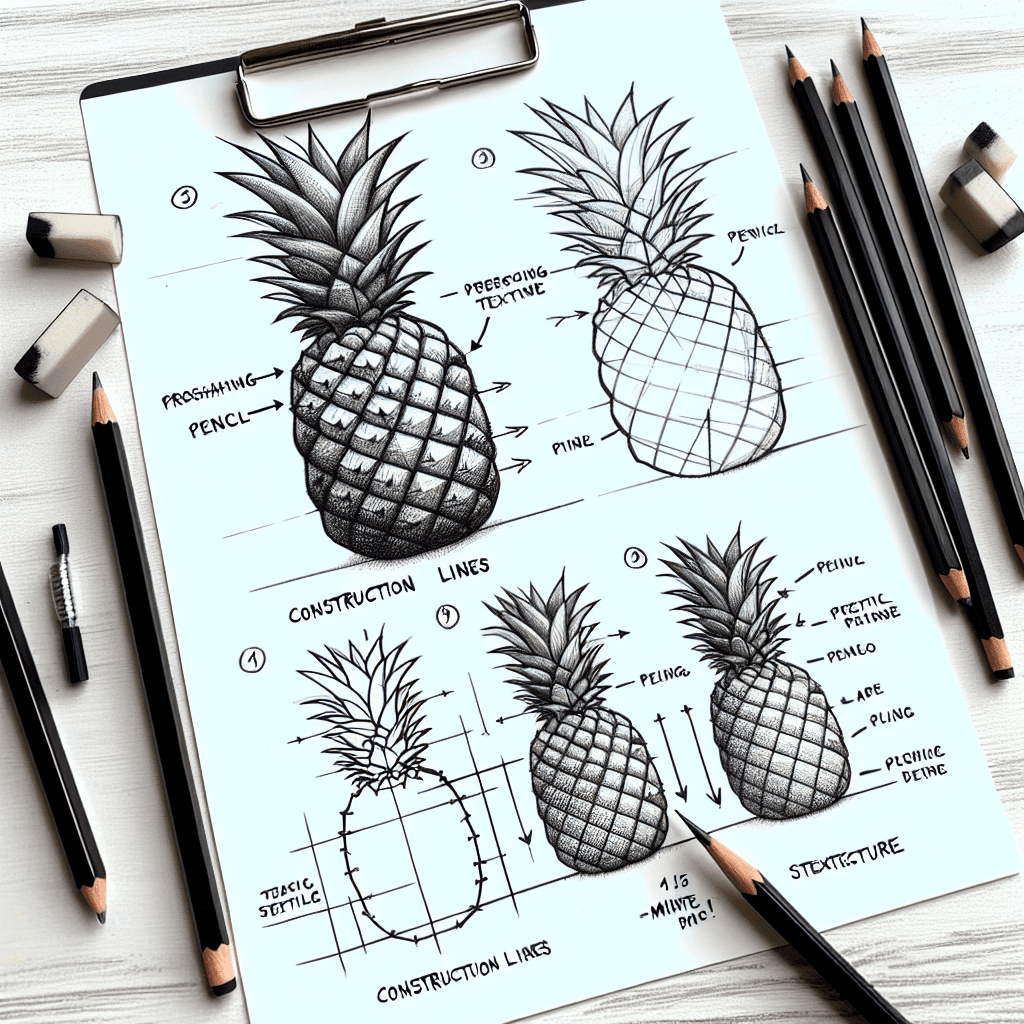
Drawing a pineapple helps beginner artists practice texture due to its distinct, bumpy surface and pattern. Using cross-hatching to portray its complex skin can enhance understanding of texture rendering techniques.
What you'll need
Step-by-step: how to draw pineapple
Start by drawing the basic oval shape of the pineapple lightly with a pencil.
Sketch the grid-like pattern on the pineapple’s surface, keeping lines light and evenly spaced.
Identify a light source and begin applying cross-hatching in the sections of the grid to show the bumpy texture.
Use varying pressure in your pencil strokes to create shadows and highlights, enhancing the texture.
Add details to the pineapple's crown with jagged, overlapping strokes to capture the spiky texture.
Before you start: what to look at
Observe the pineapple's skin closely: notice the diamond-shaped patterns and how each has a central bump or node. Take note of the way light hits these nodes, creating small highlights and deeper shadows in the recessed areas. Look at the proportion of the crown to the body, noting how the spiky leaves overlap and cast shadows on the surface below.
Pro tips for drawing pineapple
Common mistakes drawing pineapple
Self-evaluation checklist
Check if the drawing conveys a sense of the pineapple’s bumpy and irregular surface. Ensure the cross-hatching accurately reflects light and shadow, enhancing the texture realism.
Frequently asked questions
How do I make the bumpy texture of the pineapple look realistic?
Focus on the cross-hatching technique: use it to create depth by applying more pressure in shadowed areas and lighter strokes where the light hits. Consistency in the diamond shapes and their small central bumps is key.
What is the best way to draw the pineapple crown?
Use quick, jagged strokes to capture the spiky texture of the leaves. Overlap the strokes to show how the leaves layer over each other, varying the length and angle to create a more natural appearance.
How can I make sure the pineapple looks three-dimensional?
Pay attention to the light source and use shading to create volume. The cross-hatched areas should follow the contours of the pineapple, with darker shadows on one side and lighter highlights on the other, enhancing the overall form.
More drawing lessons
Get a new drawing lesson delivered to your inbox every morning, free.
Subscribe to Draw Daily →