What you'll learn
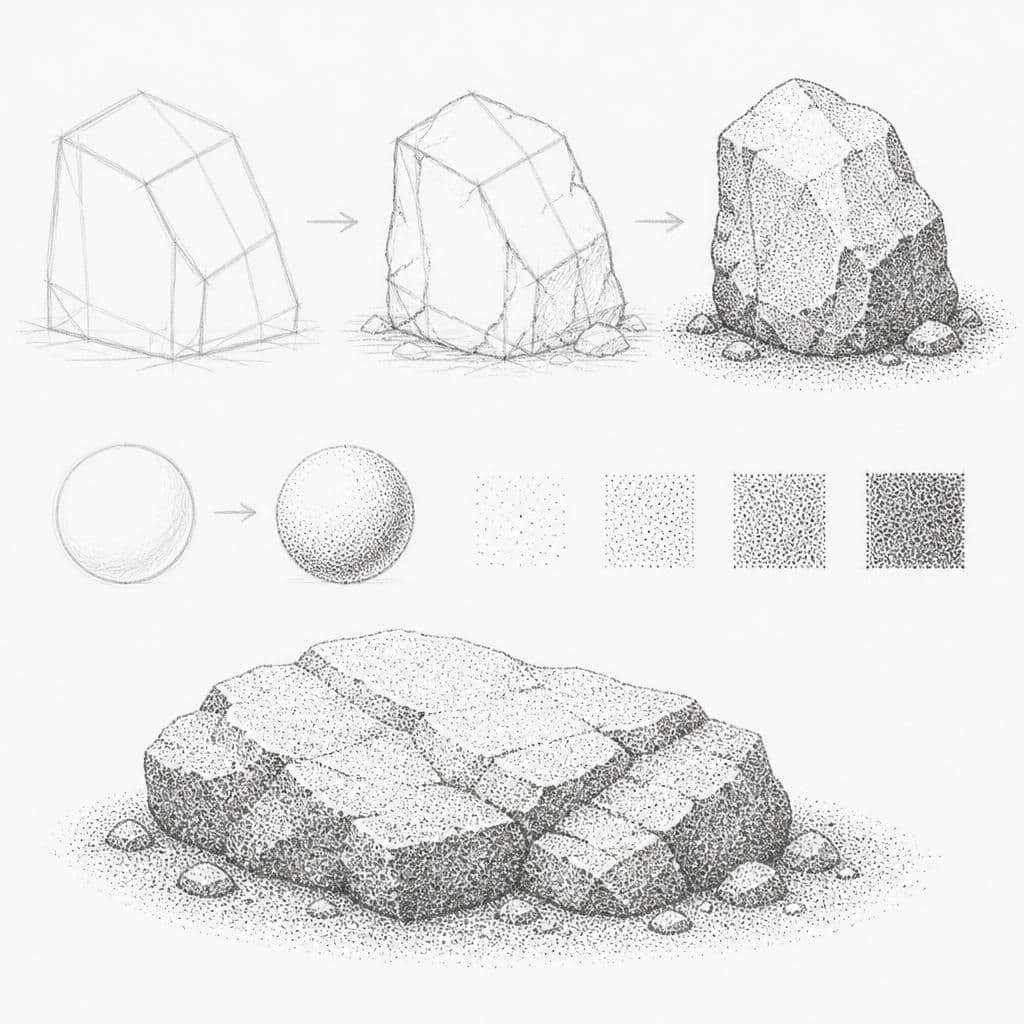
Drawing a rocky surface helps beginners focus on capturing irregular textures through varied lines and shading. This exercise will aid in observing and recreating natural roughness and depth using stippling.
What you'll need
Step-by-step: how to draw rocky surface
Begin by sketching an outline of a small rock or boulder from observation or imagination.
Identify areas where shadows fall and where the surface is lighter. Lightly shade these areas to mark them.
Use stippling to create texture on the surface, focusing on darker sections first. Apply more dots in shaded areas.
Gradually build up the texture with varied density of dots, concentrating on the uneven parts of the rock.
Refine the sketch by adding more stipples to enhance depth and texture contrast. Check for balance in shading and detail.
Before you start: what to look at
Notice the irregular edges and contours that define the rock's shape. Pay attention to where the light hits and creates highlights, especially on protruding surfaces. Observe the subtle color and texture variations across the rock's surface that suggest depth and roughness.
Pro tips for drawing rocky surface
Common mistakes drawing rocky surface
Self-evaluation checklist
Ensure the dots vary in density throughout the rock. The texture should convey roughness and depth effectively. Review if the illuminated areas appear distinct from the shadowed ones.
Frequently asked questions
How do I make the texture look realistic?
Vary the size and density of your stippling to mimic the natural irregularities found in rocky surfaces. Pay close attention to shadowed areas, adding more dots to create depth and contrast.
What if my rock looks too smooth?
Increase the density of stippling in uneven areas and incorporate more varied line work. Emphasize the natural indentations and raised areas by adjusting the pressure and spacing of your dots.
How can I make shadows look more natural?
Study the way light interacts with the surface, noting where shadows fall. Use a denser stippling technique in these areas and blend outward to ensure a gradual transition from shadow to light.
More drawing lessons

Get a new drawing lesson delivered to your inbox every morning, free.
Subscribe to Draw Daily →