What you'll learn
Drawing a pumpkin helps you practice shading techniques due to its smooth, curved surface and varying light reflections. It also allows you to explore the gradual transition between light and shadow.
What you'll need
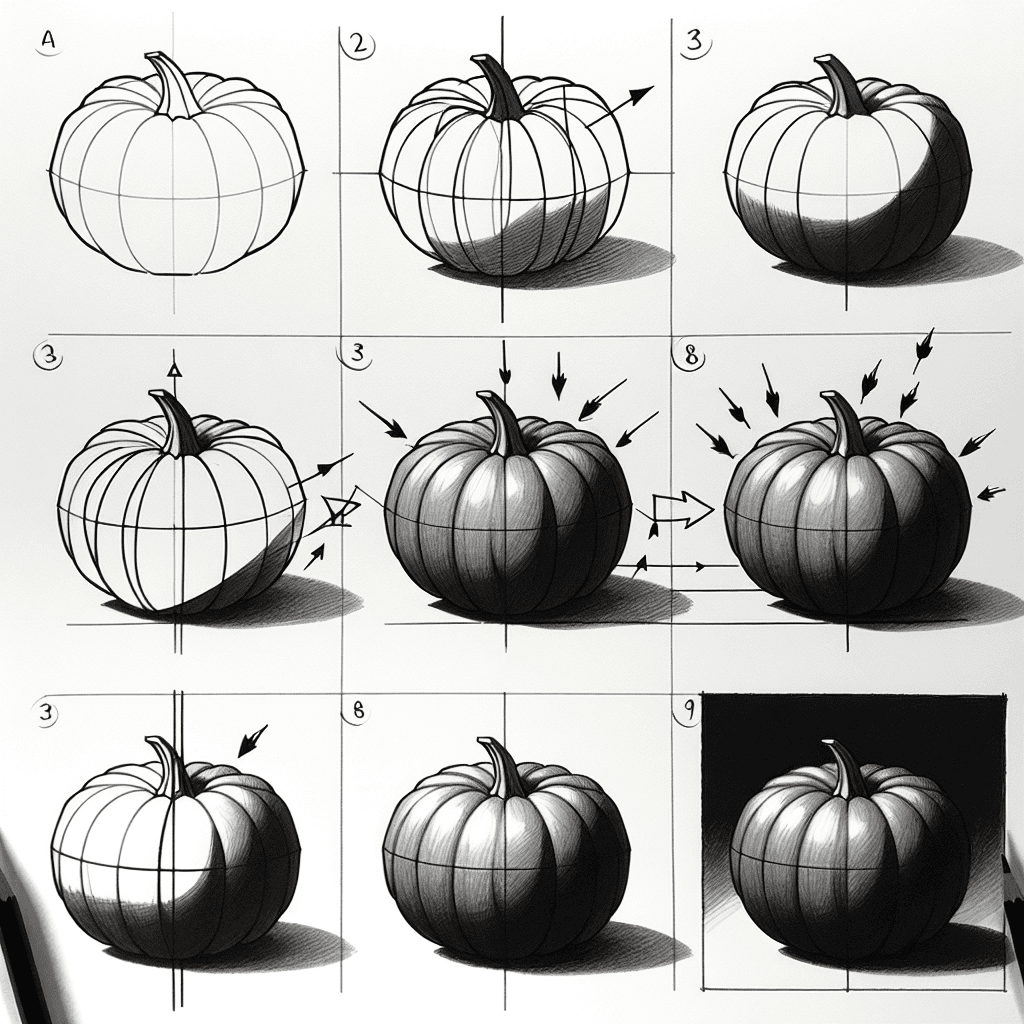
Step-by-step: how to draw pumpkin
Start by sketching the basic outline of the pumpkin with light pencil strokes.
Identify the light source and mark the areas where the light will hit the pumpkin.
Begin shading the darkest areas first, paying attention to the curves of the pumpkin.
Gradually build up the shading around the curves, blending towards the highlighted areas.
Refine your drawing by adding details and depth, ensuring smooth transitions between light and shadow.
Before you start: what to look at
Look at the pumpkin's ridges and how they create shadows and highlights along its curves. Observe where the light lands on the top and how it gradually fades as it wraps around the sides. Notice the stem's texture and how it's often a different shade than the pumpkin body, adding contrast.
Pro tips for drawing pumpkin
Common mistakes drawing pumpkin
Self-evaluation checklist
Check if the shading smoothly transitions from dark to light and if the pumpkin appears three-dimensional. Ensure that the highlights and shadows accurately reflect the light source.
Frequently asked questions
Why do pumpkins have ridges, and how should I draw them?
The ridges are natural divisions in the pumpkin's outer skin. Draw them as curved lines that follow the contour of the pumpkin, varying in width and spacing for a more natural look.
How can I make the pumpkin look more realistic?
Focus on the subtle variations in shading to emphasize the roundness of the pumpkin. Ensure the highlights and shadows are accurately placed based on the identified light source.
How do I handle the pumpkin's stem in my drawing?
Observe the texture and shape differences of the stem compared to the pumpkin. Use sharper lines and darker shading for the stem to add contrast, and note its direction and how it attaches to the body.
More drawing lessons
Get a new drawing lesson delivered to your inbox every morning, free.
Subscribe to Draw Daily →