What you'll learn
A ceramic mug is an excellent subject for beginner artists to practice observational drawing. Its simple shape helps focus attention on proportion and line quality without overwhelming with detail.
What you'll need
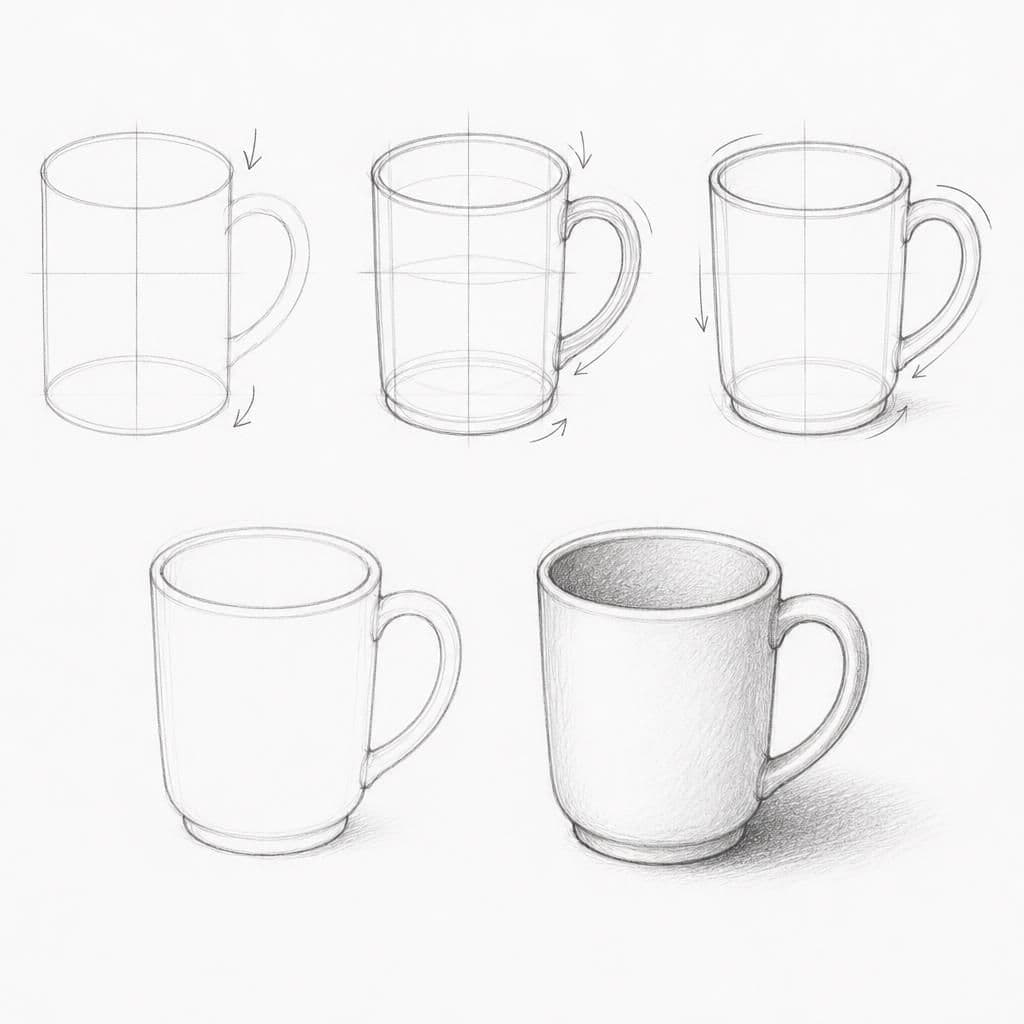
Step-by-step: how to draw ceramic mug
Find a ceramic mug and place it in good lighting on a stable surface.
Sit comfortably and spend a minute observing its shape, how light affects it, and any distinct features.
Begin drawing the mug's outer contour slowly, avoiding lifting your pencil to train your eye to follow its lines.
Focus on the handle's connection to the mug, sketching its curves and shadows.
Review your drawing, making any adjustments to proportions you notice from further observation.
Before you start: what to look at
Examine the subtle elliptical shape of the mug's opening, noting its symmetry and how it relates to the body. Observe where the light creates highlights on the glossy surface and where shadows fall, especially along the handle. Pay attention to the base's curve and how it transitions into the mug's sides.
Pro tips for drawing ceramic mug
Common mistakes drawing ceramic mug
Self-evaluation checklist
Compare your sketch to the actual mug. Note if the proportions feel right and if the contours accurately reflect the mug's shape. Check how well you've captured the handle's placement and curvature.
Frequently asked questions
Why is it important to draw the mug's opening as an ellipse?
Drawing the opening as an ellipse reflects the correct perspective when viewing the mug from an angle. This helps in capturing the three-dimensional aspect of the mug, making your drawing look more realistic.
How can I accurately capture the handle's shape and attachment?
Observe where the handle connects to the mug and note the curves as it extends outward. Pay attention to its proportion and how light and shadow define its form, which can help anchor it to the mug visually.
What should I do if my mug looks flat in the drawing?
Focus on adding shading to suggest volume. Identify the light source and add shadows to areas that are naturally darker, like under the rim and handle. Highlights on the mug’s surface can also convey its rounded shape.
More drawing lessons
Get a new drawing lesson delivered to your inbox every morning, free.
Subscribe to Draw Daily →